Showing posts with label demo. Show all posts

Friday, December 13, 2024

I Despise the Sound of Breaking Glass

 So, this happened.

I shipped a piece to Europe and it arrived smashed.  I'll bet you want a forensic analysis of what I did wrong!  Well, I had a crate made and it was a good crate (wooden box packed inside a bigger wooden box).  Maybe it could have been a little bigger to accommodate more rigid foam--but I didn't think so at the time since I have received much undamaged sheet glass from Europe packed in a whole lot less.  

I shipped it using a big international shipper--not an art shipper.  Maybe not the best idea, but affordable. Again, that's how I have received sheet glass. Always unbroken, and sheet glass is much more at risk than a stained glass window which is made up of much smaller  pieces.

Upon analyzing the damage to the crate and the window, we (Myself, and experts Rick Prigg and Glenn Carter) determined the crate had fallen over and remained horizontal while traveling.  This accounted for the smashing, which was due to shock and then the clam-shelling which is what happens when the broken pieces rub against each other repeatedly.  Horizontal is always bad for stained glass and the labeling on the crate didn't result in anyone righting the crate.  (Solution: next time, add plywood wings to the bottom of the crate so it can only ride upright.  This is what the person who shipped it back to me did.)

"Isola" in all its unbroken glory

I wanted to restore the window because I feel it is one of my best ever.

Broken pieces marked with an "X".  However, the large piece under her feet is also broken but I didn't know that until later as the breaks are so clean.


I was able to claim $ for the repair from the shipping company. Yay me.  I was very surprised, actually, as I had been told entire skyscrapers in Omaha are dedicated to offices of people who's sole job it is to deny claims.  They were very nice, actually.

Here are some pictures of the first step of restoration, which is to remove the broken pieces by unsoldering them.  This is NOT easy or simple. In fact, I wouldn't wish it on my worst enemy.  A loathsome process! It took hours and hours to remove them because it must be done very slowly and carefully to prevent further damage.  It takes two people. Two ridiculously patient people. The person you see here is Rick Prigg who is truly an expert (as well as one of my best friends!). He runs Sycamore Studio and Gallery 26 in Lansdowne and if you need  stained glass windows, newly designed or damaged ones repaired, I highly recommend him!

Below are some pictures of the de-soldering process.  Stay tuned for more posts regarding the restoration of this piece!!

Uncrating the piece

Beginning to unsolder (damn, its messy!)


Isola unsoldered.

 
Removed broken pieces.  The figure, the water and the sky will be totally remade.
Top: broken pieces Bottom: Broken pieces pushed together.  Since the break is so clean and the section so difficult to reproduce, this section will get hxtal-ed back together.  Hxtal is a glass glue--stronger than glass, actually.  When its complete the naked eye will not be able to detect any cracks.


Saturday, December 26, 2020

Sandblast videos

 I have always wanted to make instructional videos.  Covid is making that dream a reality!

The first two are on sandblaster setups and equipment and Sandblaster Maintenance.

Sandblaster Setups and  Equipment

Sandblaster Maintenance

Sunday, January 27, 2019

Festival of technical


"Murdered Animal" 2018  see pics below!
It is no surprise, but I get a lot of technical questions.  Also, I get a lot of non-questions.  meaning, I hear or overhear discussion of the techniques I employ and its often incorrect.  So here's a post regrading all that stuff.
Remember, I post here under the tag demo, for more detailed information on specific pieces.

Some procedural details: first of all, I do not mind sharing.  I am happy to let people know how the look of my work is accomplished.  I invented very little of it (the file engraving being the exception), but I think my contribution is just how much of these techniques I use and my orchestration of them. Finally, I can tell in general how the work is made, but I can be very experimental and my procedures vary greatly.  So the descriptions here are in general.  in no way are they "rules" or even an accurate description of my methodology--it is in flux (glass pun!)

A few of the most common technical misunderstandings are: 1. "The work is painted" The look of my work is not the result of painting.  I do use paint, but comparatively little. I have heard people absolutely insisting that its painted. NO NO NO NO NO NO its not!!!!!  This is me speaking, and I am not only a first person witness to myself, I actually am doing this myself. What you are seeing is the results of engraving.  The only paint is black and yellow and sometimes pink.  The reds, blues, and any secondary or tertiary color made with red or blue is  the results of a combination of sandblasting and engraving. 

 2.  There is a technical difference between etching and engraving.  My work is not etched.  In both glass and metals, 'etching" refers to the use of acid.  Engraving refers to the use of tools.  My work is engraved.  Over and over again, I see people misusing these terms. Etching=acid, engraving= tools.

I start with a sketch-  I do not typically work with a complete sketch (and only very rarely do I work with a color sketch) as I like to leave many of the creative decisions (and the color choices) for when I am actually working with the glass.

Once I have some idea of what I want to do, I start cutting the glass.  The glass I use the most is called “Full Antique Flash Glass”.  I prefer Lamberts or Verriere St. Just, both hand blown and imported from Europe.  Flash glass is a type of stained glass with a paper thin layer of intense color on a lighter, thicker layer. Despite the name, the glass is not actually “antique”.  This glass has the advantage that the color can be removed by sandblasting and engraving revealing a contrasting area of color.

I use a regular steel wheel cutter to cut the glass and I also use the standard stained glass equipment of a grozing and running pliers to further refine the shapes. After the glass is shaped, I grind all the edges on a router type grinder.  I do this partly because I am still squeamish about getting cut  (after all these years!)

The next step is to do any sandblasting that needs to be done.  Sandblasting is a process by which one can remove areas of the colored layer by abrading the surface with sand at a high pressure.  I use a variety of resists to create stencils for sandblasting, including glue and masking tape, but the most common type of stencils I use are hand cut translucent adhesive vinyl or a photographic film that is glued to the glass.

Sometimes people think sandblasting is like an airbrush and can make a refined image.  However, I only use it to prepare the surface of the glass for engraving and to remove large areas of color.  It is a clumsy machine and I do not use it to make detailed images. 
And now we get to nitty gritty (also a glass pun!) After sandblasting,  I engrave smaller details.  I have several engraving tools.  Civilians would be reminded  of dentist drills. I use diamond ball burrs and cold water.  In conjunction with power tools, I also use diamond hand files to further refine the engraving.  This is the part of the process when the image gets its detailed, tonal look.  It also takes forever and can be physically painful.  
In terms of work, the cutting and sandblasting take a very short time, but this stage can take weeks and weeks.  To make a nice engraving of about 5" would take a day or so.

The next step is painting with glass paint.  The only color I use is black or very occasionally,  brown.  I paint it on and fire it in a 1250˚ F kiln to adhere it permanently.  I usually do 2-5 firings per piece of glass as that is the best way to get rich blacks and tonal variation.  I also use silver stain.  Silverstain, the origin of the term stained glass, is silver nitrate in a gamboge base--not really paint as it penetrates the surface of the glass and actually stains it yellow.  When it comes out of the kiln, the gamboge is washed off to reveal the yellow.  Lately I have been working with pink enamels.  (Note: the terminology is confusing, enamels, vitreous paints and stain are all different things to a stained glass artist, although they could all be sort of classified as "paint" since you paint them on.  They all fire on in a kiln and are permanent until the sun burns out and the universe collapses.)  I have been known to use a tiny bit of cold paint but only on windows to be displayed in lightboxes as it is not UV safe for all of eternity.
This is all the paint I use—most of the color in my work is the flash glass itself.

 One reason there is a lot of color in each section of my pictures is that the flash glass is layered--sometimes up to 5 pieces deep.  Some of the faces I’ve made have used a layer of blue on clear flash, a layer of brown on clear, pink on clear, and red on clear.  There’s no particular predetermined order—just what looks good.
Now regarding this procedure: 1. sandblast 2. engrave, 3. file 4. paint: I almost always go back and repeat many of these stages several times. Sometimes I engrave into the fired paint.  Until satisfaction is attained...or I give up the fight.

Once all the parts are done for a window, I assemble the piece using copper foil and sometimes lead.  In the layered areas, I use a wide copper foil.  Then I solder it together, frame it with zinc and it’s done!
Top: Blue flash glass, sandblasted and engraved
Top: Blue flash glass, sandblasted and engraved.  Bottom, Red flash glass, sandblasted, engraved, vitreous paint (stencil black #1059 Reusche)
All the blue pieces for the entire piece.  Sandblasted and engraved.  The pink is cold paint.
All the red pieces (plus the  blue lion), sandblasted, engraved, filed, vitreous paint (stencil black #1059 Reusche), silverstain #3

-->

Thursday, May 31, 2018

Three pieces deliberately using historical stained glass forms


“Immigration Policy”, 26” x 20”, 2017
“Meadow”, 20” x 24”, 2018
“Demonology”, 23” x 27”, 2018
Click to enlarge!  I command thee!

 At some point, I think in 2017, I decided to do a few painted rondels.  Why?  Because they are fun, fast and easy!  Or at least sort of. (More on rondels here) The medium on all three is vitreous paint.  Vitreous paint is the term in the stained glass bizz for glass paint which fires on at about 1225F and comes in about ten drab versions of grey, black, brown and blah.  While a lot of technical hooha is enabled by the whole subject of the how to use vitreous paint, the fact is you can be very, very low tech with it as well.  Mix with water to your desired consistency, somehow put it on the glass (brushes, perhaps, but hey, you can finger paint, spray it, dab it on with a paper towel, whatever, with it if you want.)  Then you stick it in a kiln and bring it up to temp.  Then cool it down.  It’s not tricky.
You can add stuff to it, like gum Arabic, which helps it stick to the glass or you can skip that. You can mix it with various oils instead of water, or vinegar or turps.  Whatever—do your own experiments!  As your glass instructor I can guarantee one thing with certainty: something will happen.
Exciting glass shop talk: vitreous paint is not the same thing as enamels, which are colored and fire on at a different temp.  I don’t use them, so I have nothing to offer here.  (99% of the color in my work is generated by engraving flash glass.)
As for painting method, the rondels have sandblasted areas.  The “Immigration” one is all sandblasted, “Meadow” just certain flowers and the figure and “Demon” just the character.  I paint in stages, here is a link that will explain it. 

In addition, these rondels incorporate silverstain.  Silverstain info here:

As for the rest of the three windows, the painting technique is the same.
So that’s the shop talk section of today’s lesson except one last very important thing: I am working with a part time assistant, the lovely and wonderful Karisa Gregorio, who gets credit for much of the cutting of the glass.
Now for some thoughts on the pieces in general.
Having made the rondels, I stored them away until such a time as a resolution for how to use them was revealed to me.  It is exceedingly rare that I have a complete plan for what I am doing at the outset.  Au contraire!  I usually am feeling my way through the process and I don’t wish to force conclusions on these budding, gestation “idea things” before they are ready.  Instead of imposing some idea or plan on them, I prefer to wait and let them tell me what they want.  Sometimes that can take years!!  (I keep lots of parts in progress in Tupperware containers.)

Now, someone near and dear to my heart likes to tease me about my use of copperfoil instead of the traditional method of assembling with lead.  As it happens, I was trained in art school to use lead.  My teacher, Ursula Huth, was in line with many stained-glass makers in her philosophy that lead is beautiful, historical and full of artistic integrity while copper foil is for amateurs and charlatans.  So, I certainly got the message about what she thought was the ONLY way to go about assembling.  I have heard it many times since.  (I stick with copperfoiling for a few reasons: 1. It is more suited to my technique of layering. 2. It is super strong, despite what some people say –read more here: https://jancikarts.com/the-copper-foil-vs-leaded-technique-myth/
3. It can look very beautiful if you do it well.)

Anyhoo, I decided, owing to the teasing and all, that I would show him!  I decided to make “Immigration Policy “and subsequently “Meadow” and “Demonology”, with traditional leading to prove that not only could I do it, but I can do a decent job of it.  Leading is unforgiving and difficult.
A note about the design of all three windows:  being teased about leading is only the tip of the iceberg.  For some reason, there are a lot of people in the field of stained glass who do not consider me to be part of their profession.  Now I suppose I could say “well who cares what they think!!!” however, I feel it is important to my work that it be understood in the context of stained glass history.  Without getting too deep into it, one of the main inspirations for my work is the history of the medium.  I am constantly looking at historical work.  Both the medium and the message of stained glass is at the very core of every piece I do even if what a layperson sees is mostly the subject matter of the picture.  So, it bugs me to be excluded.  I gather my work seems a bit to radical, both in terms of technique and subject for hard-line traditionalist to stomach.

These three rondel windows, therefore were conceived to be very, very closely allied with the Baroque secular windows which incorporate black, white and silverstained rondels into a matrix of quarries (diamond shapes with weird little pictures on them) or, in the case of “Demonology” bullions (round shapes.)  In “Demonology the idea for the colored bits in between the bullions comes from this window:
Medieval window with quarry design
Add caption
My design.  Cut by the fabulous Karisa Gregorio.

More thoughts on the pieces individually.  And please note that if I share my interpretation of the so-called meaning with you, it should not preclude you from coming up with your own, which   might be very different from mine.  I strive to be open ended in my imagery for this very reason.

"Immigration Policy"
“Immigration Policy”
Although the title refers to Trump’s policies, which disgust me, the piece is possibly about something else.  I make these images in some kind of verbal-free fugue state.  That’s my new word for “intuitively” which I understand is off limits in artist’s statements owing to its vagueness and overuse.  I hope “verbal-free fugue state” will explain itself.  Suffice it to say, I am not sweating over messages, meanings, or interpretations.  I am actively trying to go back to an age when I was able to make pictures without all kinds of layers of analysis.  My feeling is I will analyze it LATER…like at the opening! 
I was called to task by a good friend and wonderful glass  artist, Sasha Zhitneva, on this one, who is a dog lover.  She was pretty much horrified at the tragic scene, as would any normal. compassionate human, I would think--so what does that say  about me?  And had it been anyone other than a friend I might not have taken the time to think about what an image like this means…I mean, I am a HUGE animal lover…what on earth could drive me to create such a thing?  1.  The need to express my horror at how humans treat animals 2. The need to express my horror at how humans treat animals and 3. The need to express my horror at how humans treat animals.  I hope you understand now.
I also believe: the dog will never drown as this is a 2-d image and not reality.  Neither will the dog be saved. It is stuck right where it is in perpetuity.
I do not care about the people on that ship.  It’s all about how, in their vanity, they have harmed an innocent animal.  The piece could also be about habitat destruction, global warming…etc.
Partly inspired by this image from this book
Quarries.  No GMOs!

"The Meadow"
“The Meadow” 
The title was supplied by Astrid Bowlby!
This piece was one in a series in which I strive to create a human figure but simultaneously avoid doing the thighs.  Thighs are not only a problem section of any actual body, they are also boring as all get-out to render. So by planting her in a meadow, I could cover them with stuff.
I was trying to suggest either a child at peace resting in a lovely overgrown meadow or a dead body.  Your pick.
Meadow rondel detail

My feelings after Nov 9, 2016 (prior to silverstaining)
“Demonology”
…originally called “Trump Election Commemoration Plate Design” when it was just a rondel as a joke.  First of all, shout to Rick Moody whose bookprovided the title “Demonology”.  (He is a friend, I asked his for his blessing on stealing his title.)
"Demonology"
Well, does this really require any explanation?  Who among you hasn’t felt this way at times??
There are three chickens in this piece.  Why chickens?  You got me...
Thingummibob
One of the things inspiring this was my long abiding admiration for artists of the northern Renaissance like Bosch, Breughel and DavidRyckaert.  But of course, also the marginalia in Medieval manuscripts which is very imaginative and not bible-related, creating moments of hilarious juxtaposition, considering that it IS a bible that well-endowed, misbehaving in the naughtiest way pagan thing is appearing in (which some scholar could probably put forth as an obvious precursor to Bosch and the like.  He’s so often presented as coming out of nowhere….)
Just where in the bible does it mention Mr. Testicle Monster?
MANY artists have tackled the theme of “The Temptation ofSt. Anthony”.  Why?  I know why!  Because it’s an excuse to do all sort of fun stuff with impunity.  It’s the fantasy sci-fi occult art before modern times.  Anyway, “Demonology” is my contribution to that tradition.
-->

all photos of my work by Dominic Episcopo

Tuesday, May 13, 2014

Five Small studies

-->
I did them for a few reasons: for the sheer fun of it (and they were fun), and some are tests for work I want to make bigger.  Also, I neglected to order the glass I needed to finish the large window I am making and the final sculptures were not done being cast, so I had an open couple of weeks.  That will not do!!!

So, when I say “for the sheer fun of it”, I mean that part of what I wanted to do was explore motifs and techniques in a “safe” way—i.e. low stakes because they are small and not all that time consuming or expensive.

Here’s the dirty low on each one:


“Threshold” 16.5” x 7”
I keep returning to this figure that is banging on a door.  Like a cat, I imagine she wants to be let in if she’s locked out or she wants out if she is locked in.  I made this particular figure in b+w last year, but decided to finish her as part of this series.  The other one is not done yet as she will have a color test which is taking a bit longer.
Here is a piece from 1999 with the same motif.  It is in the V+A in London. 

Birdbath”, 35” x 18”
Why am I so obsessed with this theme?  I dunno.  Paging Dr. Jung!
NOT DONE YET!  9" x 5"

“Murder of Crows”  10" 10"
Three stages of painting
 I doodled the head and figure separately, as I often do.  I wanted to make at least one roundel as I consider myself to be rather massively influenced by this tradition.  Here are some awesome examples from Ye Olde Country (England).


_____________________________________________
“Ennui”  12" x 14"
Three stages of "Ennui" in progress
 
(Alternative title, “Ageing Cheesecake”):  Yeah, I’m 53 so whadaboudit????

“Luster”  12" x 13"

three stages of painting Luster in progress
A kinky suntan or maybe not. Maybe its you who are the pervert? The chain is not attached to anything.  I like you to interpret these things, not me.


 “Three Tiered Cosmos”  12" x 15"
 three stages of painting “Three Tiered Cosmos”
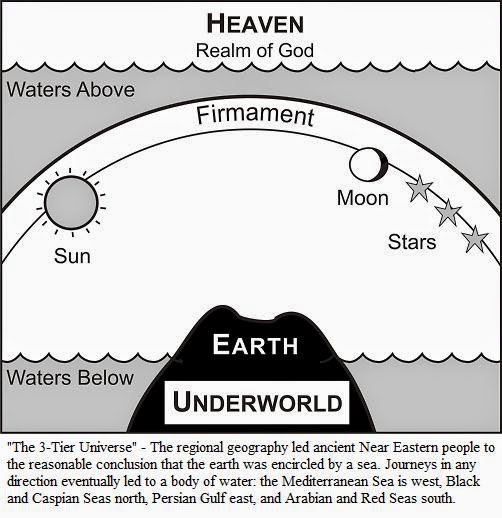
This I can say the most about.  In the post below I am going on about “The Mind in the Cave” and that’s where I got the idea of what to do with this sketch.  I was originally imagining her on a “desert island”—one of those tiny comic strip trope islands, big enough for only one person.  Reading about the universality of the three tiered cosmos got me thinking as I wanted to depict her island surrounded by fish which I was sort of loosely associating with the subconscious (or, in macrocosmic terms, the underworld).  By using the concentric ovals, I put the sky surrounding the whole thing.  I just needed to make her desert island into some sort of yin/yang because design-wise, I was making the underworld dark and the heaven light and the middle had to be both but the dark had to be touching light and the light had to be touching dark for it to work metaphorically and visually.  Does this make any sense?  See examples!!!


Like this!
Or this!!!  (Robert Fludd)
Or this!!  (Outside shutters of Bosch's "The Garden of Earthly Delights"


"Waiting Room" NOT DONE YET